Build a Python app with PyInstaller
This tutorial shows you how to use Jenkins to orchestrate building a simple Python application with PyInstaller.
If you are a Python developer who is new to CI/CD concepts, or you might be familiar with these concepts but don’t know how to implement building your application using Jenkins, then this tutorial is for you.
The simple Python application (which you’ll obtain from a sample repository on GitHub) is a command line tool "add2vals" that outputs the addition of two values. If at least one of the values is a string, "add2vals" treats both values as a string and instead concatenates the values. The "add2" function in the "calc" library (which "add2vals" imports) is accompanied by a set of unit tests. These are tested with pytest to check that this function works as expected and the results are saved to a JUnit XML report.
The delivery of the "add2vals" tool through PyInstaller converts this tool into a standalone executable file for Linux, which you can download through Jenkins and execute at the command line on Linux machines without Python.
Note: Unlike the other tutorials in this documentation, this tutorial requires approximately 500 MB more Docker image data to be downloaded.
Duration: This tutorial takes 20-40 minutes to complete (assuming you’ve already met the prerequisites below). The exact duration will depend on the speed of your machine and whether or not you’ve already run Jenkins in Docker from another tutorial.
You can stop this tutorial at any point in time and continue from where you left off.
If you’ve already run though another tutorial, you can skip the prerequisites and Run Jenkins in Docker sections below and proceed on to forking the sample repository. (Just ensure you have Git installed locally.) If you need to restart Jenkins, simply follow the restart instructions in run Jenkins in Docker and then proceed on.
Prerequisites
For this tutorial, you will require:
-
A macOS, Linux or Windows machine with:
-
256 MB of RAM, although more than 2 GB is recommended.
-
10 GB of drive space for Jenkins and your Docker images and containers.
-
-
The following software installed:
-
Docker - Read more about installing Docker in the Installing Docker section of the Installing Jenkins page.
Note: If you use Linux, this tutorial assumes that you are not running Docker commands as the root user, but instead with a single user account that also has access to the other tools used throughout this tutorial. -
Git and optionally GitHub Desktop
-
Run Jenkins in Docker
In this tutorial, you’ll be running Jenkins as a Docker container from the
jenkins/jenkins Docker
image.
To run Jenkins in Docker, follow the relevant instructions below for either macOS and Linux or Windows.
You can read more about Docker container and image concepts in the Docker section of the Installing Jenkins page.
Fork and clone the sample repository
Obtain the simple "add" Python application from GitHub, by forking the sample repository of the application’s source code into your own GitHub account and then cloning this fork locally.
-
Ensure you are signed in to your GitHub account. If you don’t yet have a GitHub account, sign up for a free one on the GitHub website.
-
Fork the
simple-python-pyinstaller-appon GitHub into your local GitHub account. If you need help with this process, refer to the Fork A Repo documentation on the GitHub website for more information. -
Clone your forked
simple-python-pyinstaller-apprepository (on GitHub) locally to your machine. To begin this process, do either of the following (where<your-username>is the name of your user account on your operating system):-
If you have the GitHub Desktop app installed on your machine:
-
In GitHub, click the green Clone or download button on your forked repository, then Open in Desktop.
-
In GitHub Desktop, before clicking Clone on the Clone a Repository dialog box, ensure Local Path for:
-
macOS is
/Users/<your-username>/Documents/GitHub/simple-python-pyinstaller-app -
Linux is
/home/<your-username>/GitHub/simple-python-pyinstaller-app -
Windows is
C:\Users\<your-username>\Documents\GitHub\simple-python-pyinstaller-app
-
-
-
Otherwise:
-
Open up a terminal/command line prompt and
cdto the appropriate directory on:-
macOS -
/Users/<your-username>/Documents/GitHub/ -
Linux -
/home/<your-username>/GitHub/ -
Windows -
C:\Users\<your-username>\Documents\GitHub\(although use a Git bash command line window as opposed to the usual Microsoft command prompt)
-
-
Run the following command to continue/complete cloning your forked repo:
git clone https://github.com/YOUR-GITHUB-ACCOUNT-NAME/simple-python-pyinstaller-app
whereYOUR-GITHUB-ACCOUNT-NAMEis the name of your GitHub account.
-
-
Create your Pipeline project in Jenkins
-
Go back to Jenkins, log in again if necessary and click create new jobs under Welcome to Jenkins!
Note: If you don’t see this, click New Item at the top left. -
In the Enter an item name field, specify the name for your new Pipeline project (e.g.
simple-python-pyinstaller-app). -
Scroll down and click Pipeline, then click OK at the end of the page.
-
( Optional ) On the next page, specify a brief description for your Pipeline in the Description field (e.g.
An entry-level Pipeline demonstrating how to
use Jenkins to build a simple Python application with PyInstaller.
) -
Click the Pipeline tab at the top of the page to scroll down to the Pipeline section.
-
From the Definition field, choose the Pipeline script from SCM option. This option instructs Jenkins to obtain your Pipeline from Source Control Management (SCM), which will be your locally cloned Git repository.
-
From the SCM field, choose Git.
-
In the Repository URL field, specify the directory path of your locally cloned repository above, which is from your user account/home directory on your host machine, mapped to the
/homedirectory of the Jenkins container - i.e.-
For macOS -
/home/Documents/GitHub/simple-python-pyinstaller-app -
For Linux -
/home/GitHub/simple-python-pyinstaller-app -
For Windows -
/home/Documents/GitHub/simple-python-pyinstaller-app
-
-
Click Save to save your new Pipeline project. You’re now ready to begin creating your
Jenkinsfile, which you’ll be checking into your locally cloned Git repository.
Create your initial Pipeline as a Jenkinsfile
You’re now ready to create your Pipeline that will automate building your Python
application with PyInstaller in Jenkins. Your Pipeline will be created as a
Jenkinsfile, which will be committed to your locally cloned Git repository
(simple-python-pyinstaller-app).
This is the foundation of "Pipeline-as-Code", which treats the continuous delivery pipeline a part of the application to be versioned and reviewed like any other code. Read more about Pipeline and what a Jenkinsfile is in the Pipeline and Using a Jenkinsfile sections of the User Handbook.
First, create an initial Pipeline with a "Build" stage that executes the first part of the entire production process for your application. This "Build" stage downloads a Python Docker image and runs it as a Docker container, which in turn compiles your simple Python application into byte code.
-
Using your favorite text editor or IDE, create and save new text file with the name
Jenkinsfileat the root of your localsimple-python-pyinstaller-appGit repository. -
Copy the following Declarative Pipeline code and paste it into your empty
Jenkinsfile:pipeline { agent none (1) stages { stage('Build') { (2) agent { docker { image 'python:2-alpine' (3) } } steps { sh 'python -m py_compile sources/add2vals.py sources/calc.py' (4) stash(name: 'compiled-results', includes: 'sources/*.py*') (5) } } } }1 The agentsection with thenoneparameter specified at the top of this Pipeline code block means that no global agent will be allocated for the entire Pipeline’s execution and that eachstagedirective must specify its ownagentsection.2 Defines a stage(directive) calledBuildthat appears on the Jenkins UI.3 This imageparameter (of theagentsection’sdockerparameter) downloads thepython:2-alpineDocker image (if it’s not already available on your machine) and runs this image as a separate container. This means that:-
You’ll have separate Jenkins and Python containers running locally in Docker.
-
The Python container becomes the agent that Jenkins uses to run the
Buildstage of your Pipeline project. However, this container is short-lived - its lifespan is only that of the duration of yourBuildstage’s execution.
4 This shstep (of thestepssection) runs the Python command to compile your application and itscalclibrary into byte code files (each with.pycextension), which are placed into thesourcesworkspace directory (within the/var/jenkins_home/workspace/simple-python-pyinstaller-appdirectory in the Jenkins container).5 This stashstep (of thebasic stepssection) saves the Python source code and compiled byte code files (with.pycextension) from thesourcesworkspace directory for use in later stages. -
-
Save your edited
Jenkinsfileand commit it to your localsimple-python-pyinstaller-appGit repository. E.g. Within thesimple-python-pyinstaller-appdirectory, run the commands:
git add .
then
git commit -m "Add initial Jenkinsfile" -
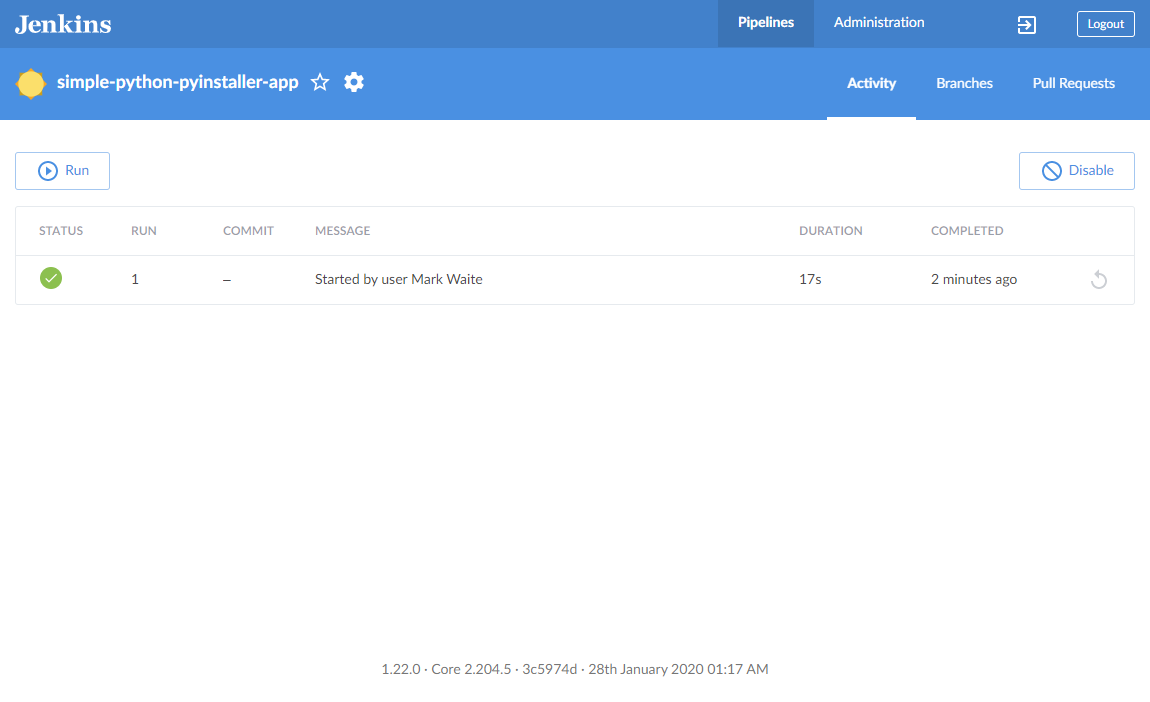
Go back to Jenkins again, log in again if necessary and click Open Blue Ocean on the left to access Jenkins’s Blue Ocean interface.
-
In the This job has not been run message box, click Run, then quickly click the OPEN link which appears briefly at the lower-right to see Jenkins running your Pipeline project. If you weren’t able to click the OPEN link, click the row on the main Blue Ocean interface to access this feature.
Note: You may need to wait a few minutes for this first run to complete. After making a clone of your localsimple-python-pyinstaller-appGit repository itself, Jenkins:-
Initially queues the project to be run on the agent.
-
Runs the
Buildstage (defined in theJenkinsfile) on the Python container. During this time, Python uses thepy_compilemodule to compile the code of your Python application and itscalclibrary into byte code, which are stored in thesourcesworkspace directory (within the Jenkins home directory).
The Blue Ocean interface turns green if Jenkins compiled your Python application successfully.
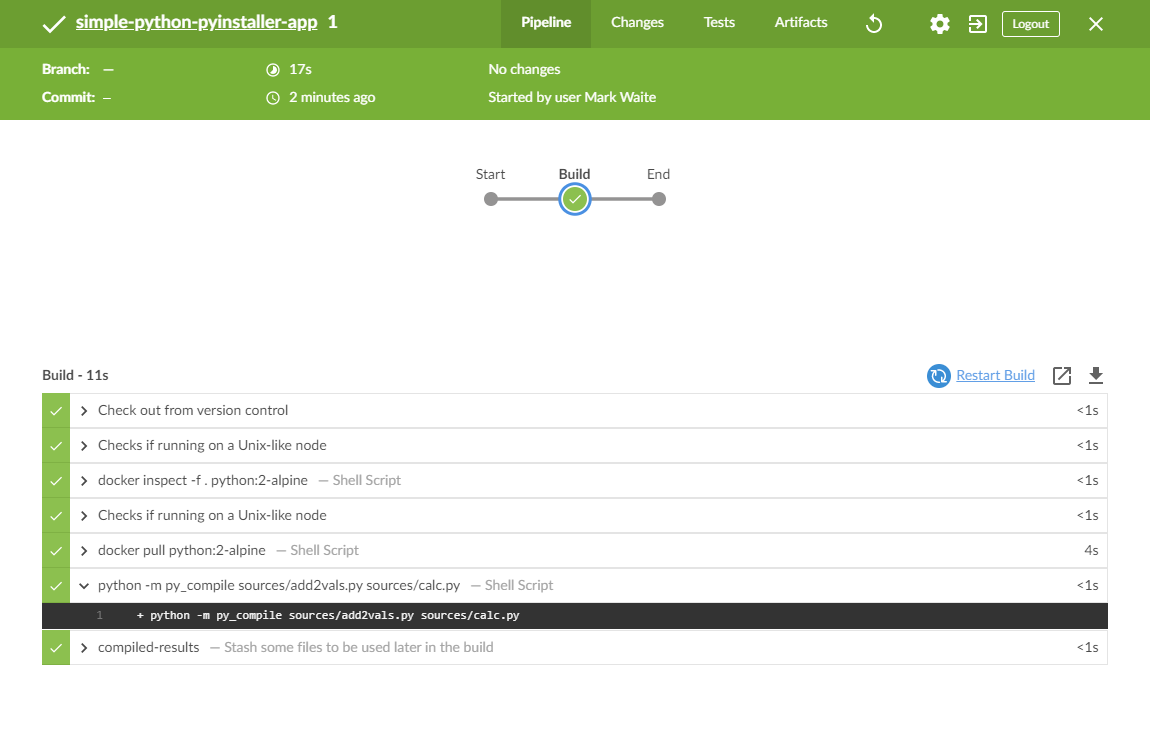
-
-
Click the X at the top-right to return to the main Blue Ocean interface.
Add a test stage to your Pipeline
-
Go back to your text editor/IDE and ensure your
Jenkinsfileis open. -
Copy and paste the following Declarative Pipeline syntax immediately under the
Buildstage of yourJenkinsfile:stage('Test') { agent { docker { image 'qnib/pytest' } } steps { sh 'py.test --junit-xml test-reports/results.xml sources/test_calc.py' } post { always { junit 'test-reports/results.xml' } } }so that you end up with:
pipeline {
    agent none
    stages {
        stage('Build') {
            agent {
                docker {
                    image 'python:2-alpine'
                }
            }
            steps {
                sh 'python -m py_compile sources/add2vals.py sources/calc.py'
                stash(name: 'compiled-results', includes: 'sources/*.py*')
            }
        }
        stage('Test') { (1)
            agent {
                docker {
                    image 'qnib/pytest' (2)
                }
            }
            steps {
                sh 'py.test --junit-xml test-reports/results.xml sources/test_calc.py' (3)
            }
            post {
                always {
                    junit 'test-reports/results.xml' (4)
                }
            }
        }
    }
}
1 Defines a stage(directive) calledTestthat appears on the Jenkins UI.2 This imageparameter (of theagentsection’sdockerparameter) downloads theqnib:pytestDocker image (if it’s not already available on your machine) and runs this image as a separate container. This means that:-
You’ll have separate Jenkins and pytest containers running locally in Docker.
-
The pytest container becomes the agent that Jenkins uses to run the
Teststage of your Pipeline project. This container’s lifespan lasts the duration of yourTeststage’s execution.
3 This shstep (of thestepssection) executes pytest’spy.testcommand onsources/test_calc.py, which runs a set of unit tests (defined intest_calc.py) on the "calc" library’sadd2function (used by your simple Python applicationadd2vals). The:-
--junit-xml test-reports/results.xmloption makespy.testgenerate a JUnit XML report, which is saved totest-reports/results.xml(within the/var/jenkins_home/workspace/simple-python-pyinstaller-appdirectory in the Jenkins container).
4 This junitstep (provided by the JUnit Plugin) archives the JUnit XML report (generated by thepy.testcommand above) and exposes the results through the Jenkins interface. In Blue Ocean, the results are accessible through the Tests page of a Pipeline run. Thepostsection’salwayscondition that contains thisjunitstep ensures that the step is always executed at the completion of theTeststage, regardless of the stage’s outcome. -
-
Save your edited
Jenkinsfileand commit it to your localsimple-python-pyinstaller-appGit repository. E.g. Within thesimple-python-pyinstaller-appdirectory, run the commands:
git stage .
then
git commit -m "Add 'Test' stage" -
Go back to Jenkins again, log in again if necessary and ensure you’ve accessed Jenkins’s Blue Ocean interface.
-
Click Run at the top left, then quickly click the OPEN link which appears briefly at the lower-right to see Jenkins running your amended Pipeline project. If you weren’t able to click the OPEN link, click the top row on the Blue Ocean interface to access this feature.
Note: It may take a few minutes for theqnib:pytestDocker image to download (if this hasn’t already been done).
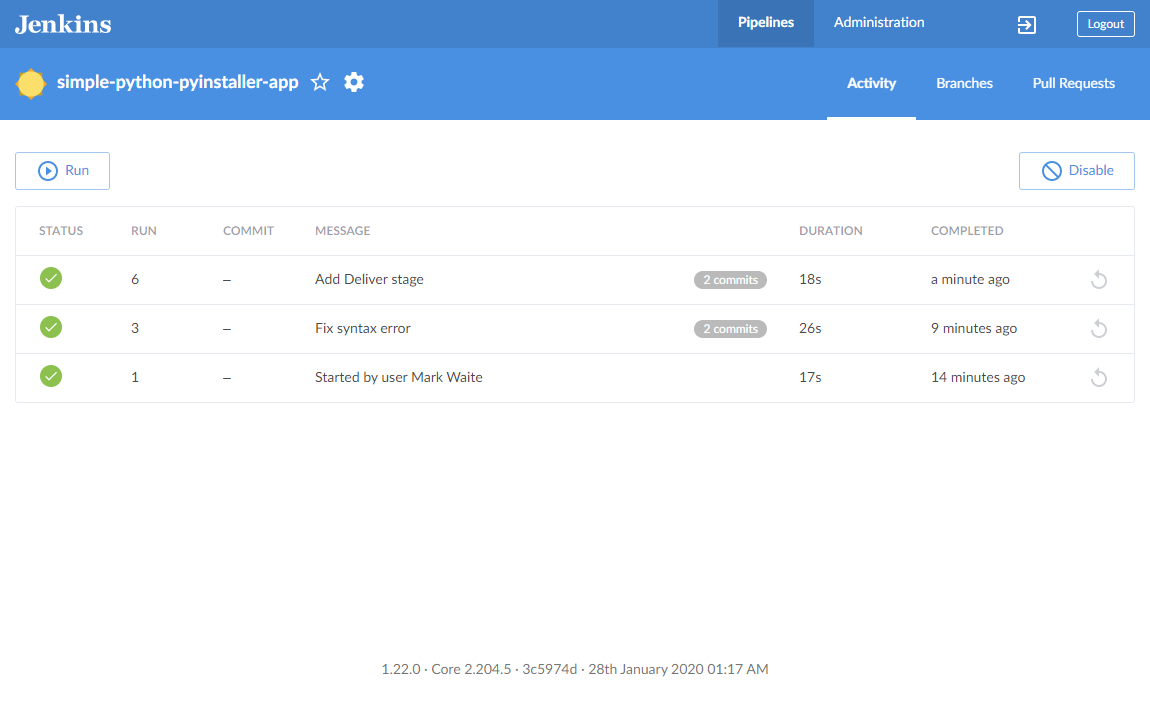
If your amended Pipeline ran successfully, here’s what the Blue Ocean interface should look like. Notice the additional "Test" stage. You can click on the previous "Build" stage circle to access the output from that stage.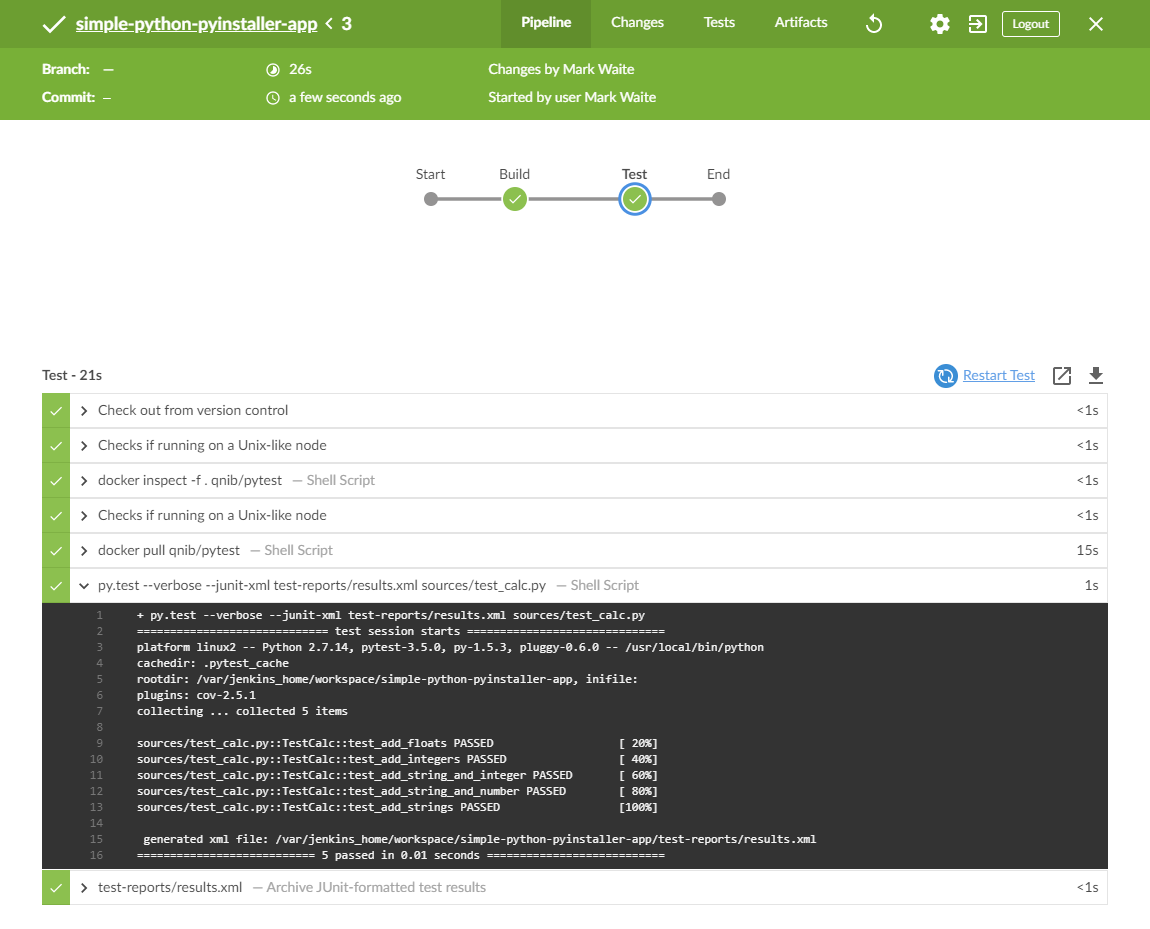
-
Click the X at the top-right to return to the main Blue Ocean interface.
Add a final deliver stage to your Pipeline
-
Go back to your text editor/IDE and ensure your
Jenkinsfileis open. -
Copy and paste the following Declarative Pipeline syntax immediately under the
Teststage of yourJenkinsfile:stage('Deliver') { agent any environment { VOLUME = '$(pwd)/sources:/src' IMAGE = 'cdrx/pyinstaller-linux:python2' } steps { dir(path: env.BUILD_ID) { unstash(name: 'compiled-results') sh "docker run --rm -v ${VOLUME} ${IMAGE} 'pyinstaller -F add2vals.py'" } } post { success { archiveArtifacts "${env.BUILD_ID}/sources/dist/add2vals" sh "docker run --rm -v ${VOLUME} ${IMAGE} 'rm -rf build dist'" } } }and add a
skipStagesAfterUnstableoption so that you end up with:pipeline { agent none options { skipStagesAfterUnstable() } stages { stage('Build') { agent { docker { image 'python:2-alpine' } } steps { sh 'python -m py_compile sources/add2vals.py sources/calc.py' stash(name: 'compiled-results', includes: 'sources/*.py*') } } stage('Test') { agent { docker { image 'qnib/pytest' } } steps { sh 'py.test --junit-xml test-reports/results.xml sources/test_calc.py' } post { always { junit 'test-reports/results.xml' } } } stage('Deliver') { (1) agent any environment { (2) VOLUME = '$(pwd)/sources:/src' IMAGE = 'cdrx/pyinstaller-linux:python2' } steps { dir(path: env.BUILD_ID) { (3) unstash(name: 'compiled-results') (4) sh "docker run --rm -v ${VOLUME} ${IMAGE} 'pyinstaller -F add2vals.py'" (5) } } post { success { archiveArtifacts "${env.BUILD_ID}/sources/dist/add2vals" (6) sh "docker run --rm -v ${VOLUME} ${IMAGE} 'rm -rf build dist'" } } } } }1 Defines a stage(directive) calledDeliverthat appears on the Jenkins UI.2 This environmentblock defines two variables which will be used later in the 'Deliver' stage.3 This dirstep (of thebasic stepssection) creates a new subdirectory named by the build number. The final program will be created in that directory by pyinstaller.BUILD_IDis one of the pre-defined Jenkins environment variables and is available in all jobs.4 This unstashstep (of thebasic stepssection) restores the Python source code and compiled byte code files (with.pycextension) from the previously saved stash image (if it’s not already available on your machine) and runs this image as a separate container. This means that:-
You’ll have separate Jenkins and PyInstaller (for Linux) containers running locally in Docker.
-
The PyInstaller container becomes the agent that Jenkins uses to run the
Deliverstage of your Pipeline project. This container’s lifespan lasts the duration of yourDeliverstage’s execution.
5 This shstep (of thestepssection) executes thepyinstallercommand (in the PyInstaller container) on your simple Python application. This bundles youradd2vals.pyPython application into a single standalone executable file (via the--onefileoption) and outputs the this file to thedistworkspace directory (within the Jenkins home directory). Although this step consists of a single command, as a general principle, it’s a good idea to keep your Pipeline code (i.e. theJenkinsfile) as tidy as possible and place more complex build steps (particularly for stages consisting of 2 or more steps) into separate shell script files like thedeliver.shfile. This ultimately makes maintaining your Pipeline code easier, especially if your Pipeline gains more complexity.6 This archiveArtifactsstep (provided as part of Jenkins core) archives the standalone executable file (generated by thepyinstallercommand above atdist/add2valswithin the Jenkins home’s workspace directory) and exposes this file through the Jenkins interface. In Blue Ocean, archived artifacts like these are accessible through the Artifacts page of a Pipeline run. Thepostsection’ssuccesscondition that contains thisarchiveArtifactsstep ensures that the step is executed at the completion of theDeliverstage only if this stage completed successfully. -
-
Save your edited
Jenkinsfileand commit it to your localsimple-python-pyinstaller-appGit repository. E.g. Within thesimple-python-pyinstaller-appdirectory, run the commands:
git stage .
then
git commit -m "Add 'Deliver' stage" -
Go back to Jenkins again, log in again if necessary and ensure you’ve accessed Jenkins’s Blue Ocean interface.
-
Click Run at the top left, then quickly click the OPEN link which appears briefly at the lower-right to see Jenkins running your amended Pipeline project. If you weren’t able to click the OPEN link, click the top row on the Blue Ocean interface to access this feature.
Note: It may take a few minutes for thecdrx/pyinstaller-linuxDocker image to download (if this hasn’t already been done).
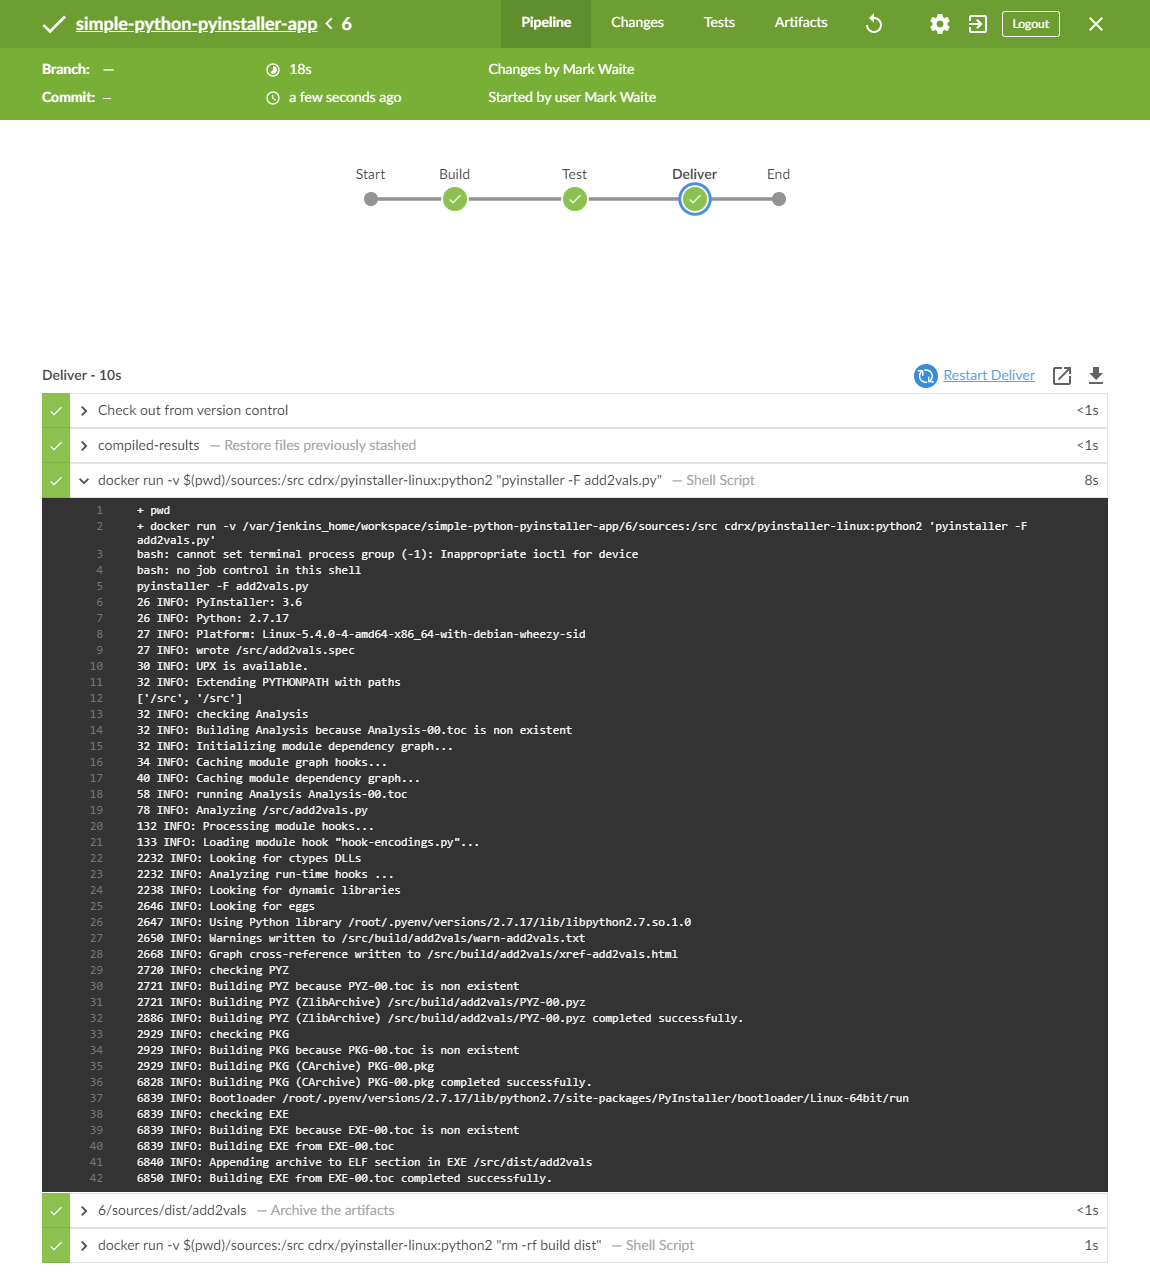
If your amended Pipeline ran successfully, here’s what the Blue Ocean interface should look like. Notice the additional "Deliver" stage. Click on the previous "Test" and "Build" stage circles to access the outputs from those stages.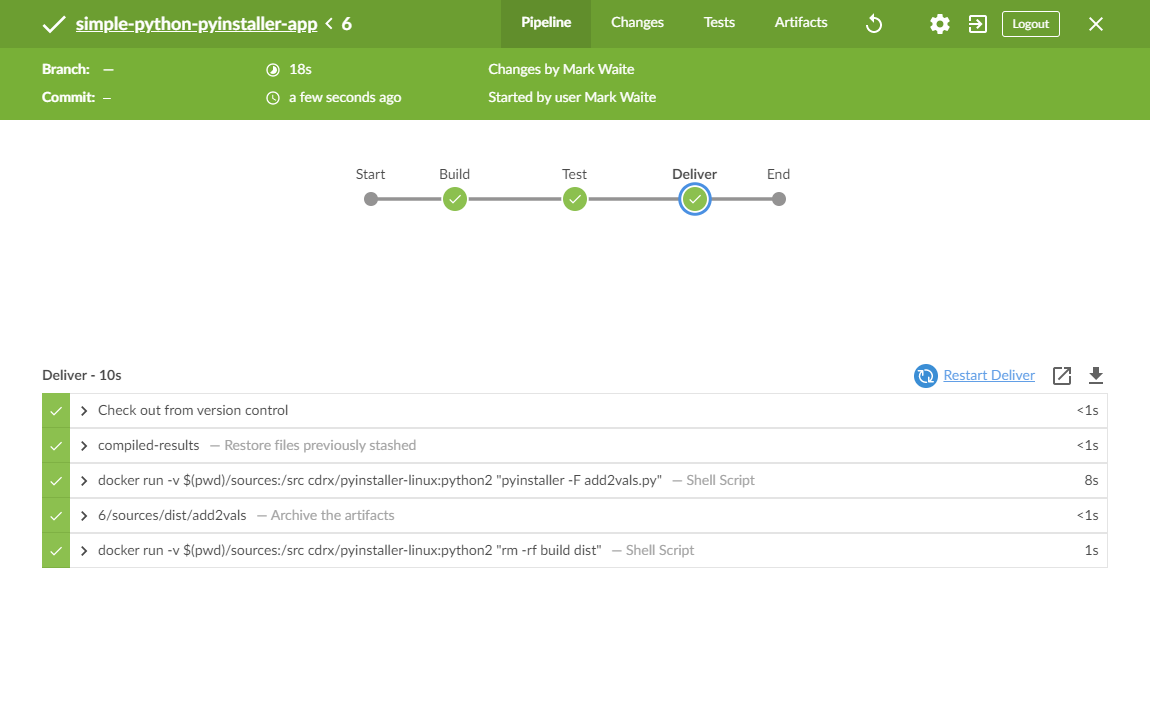
Here’s what the output of the "Deliver" stage should look like, showing you the results of PyInstaller bundling your Python application into a single standalone executable file.
-
Click the X at the top-right to return to the main Blue Ocean interface, which lists your previous Pipeline runs in reverse chronological order.
Follow up (optional)
If you use Linux, you can try running the standalone add2vals application you
generated with PyInstaller locally on your machine. To do this:
-
From the main Blue Ocean interface, access your last Pipeline run you performed above. To do this, click the top row (representing the most recent Pipeline run) on the main Blue Ocean’s Activity page.
-
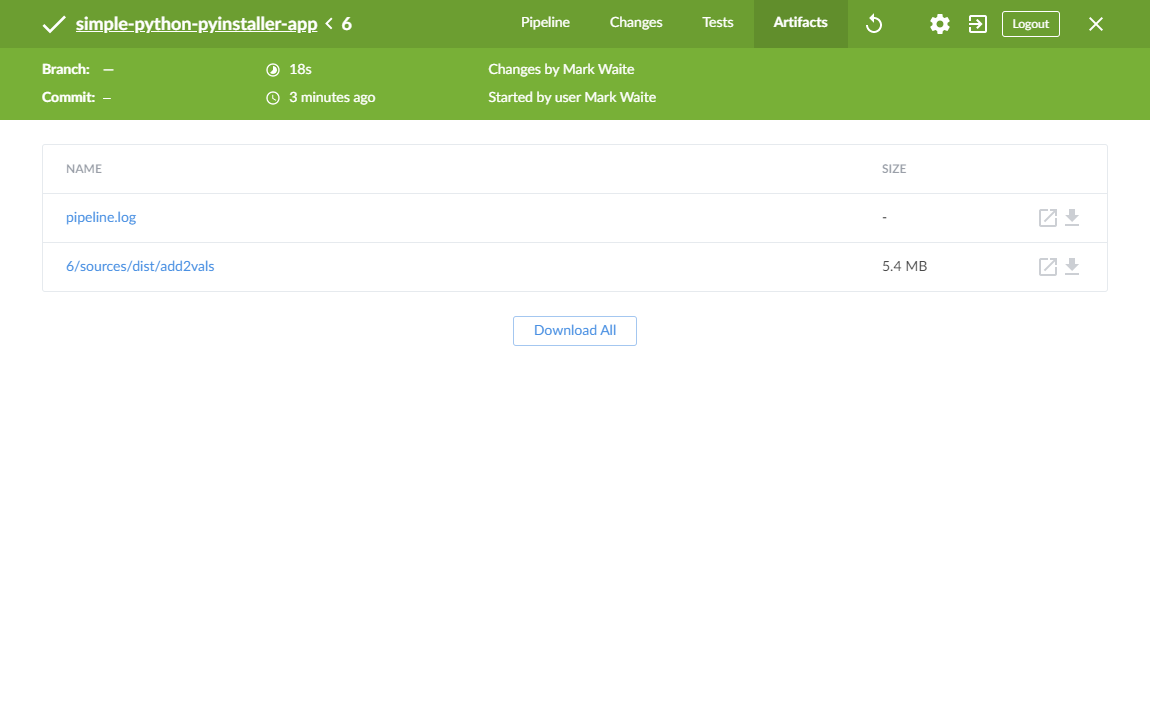
On the results page of the Pipeline run, click Artifacts at the top right to access the Artifacts page.
-
In the list of artifacts, click the down-arrow icon at the far right of the dist/add2vals artifact item to download the standalone executable file to your browser’s "Downloads" directory.
-
Back in your operating system’s terminal prompt,
cdto your browser’s "Downloads" directory. -
Make the
add2valsfile executable - i.e.chmod a+x add2vals -
Run the command
./add2valsand follow the instructions provided by your app.
Wrapping up
Well done! You’ve just used Jenkins to build a simple Python application!
The "Build", "Test" and "Deliver" stages you created above are the basis for building more complex Python applications in Jenkins, as well as Python applications that integrate with other technology stacks.
Because Jenkins is extremely extensible, it can be modified and configured to handle practically any aspect of build orchestration and automation.
To learn more about what Jenkins can do, check out:
-
The Tutorials overview page for other introductory tutorials.
-
The User Handbook for more detailed information about using Jenkins, such as Pipelines (in particular Pipeline syntax) and the Blue Ocean interface.
-
The Jenkins blog for the latest events, other tutorials and updates.